
How to use Auto Tune Basic with Dynojet PV3 for your Harley Davidson.
The Dynojet PV3 utilizes factory O2 sensors to generate tune corrections, making it an effective way to fine-tune your calibration based on real-world riding conditions. Auto Tune Basic works by processing closed-loop data from the factory O2 sensors and generating corrections for the VE (Volumetric Efficiency) tables to meet the target Air-Fuel Ratio (AFR).
Unlike standard closed-loop operation, Auto Tune Basic temporarily extends the closed-loop range, allowing it to populate VE corrections across a broader RPM and throttle position range for a more refined tune.
How Auto Tune Basic Works on PV3
The PV3’s version of Auto Tune Basic has been refined from the original Power Vision, incorporating advanced filters and logic to make tuning easier than ever.
Once Auto Tune Basic is enabled:
- Start the bike and ride as normal.
- The screen will display “Auto Tune is logging” and transition to the gauge screen.
- You will see “AT” displayed in the upper-left corner.
- When conditions are met to generate correction data, a smiley face will appear. If conditions aren’t met, a system message such as “Engine Temp Low” may be displayed.
Running Auto Tune Sessions & Applying Tune Corrections
We recommend running Auto Tune sessions in 20-minute intervals with mixed riding conditions. After each session:
- Apply Values – This applies the learned corrections back to the base tune, improving accuracy with each session.
- Disable Auto Tune – Once tuning is complete, this finalizes the changes and flashes the updated tune to your ECM.
The new tune will be saved on your PV3 device with “_AT” added to the file name and numbered in sequence. You can verify the active tune flashed to your ECM by checking for an asterisk (*) next to the title.
Firmware Requirements & Software Updates
Auto Tune Basic requires PV3 firmware version 3.7.8263.23514 or later. Ensure your PV3 device is updated by using Dynojet Power Core software:
- Open Power Core and go to the splash screen
- Select Tools > Manage Hardware
- Follow the Fuel Moto instructions for step-by-step guidance
By following these steps, you can successfully fine-tune your Harley-Davidson with Auto Tune Basic, achieving smoother performance and optimized fuel mapping with your Dynojet PV3.
Note: Auto Tune Basic requires PV3 firmware version 3.7.8263.23514 or later. Update your PV3 device as necessary using the Dynojet Power Core software, go to the splash screen and select Tools > Manage Hardware, or view the Fuel Moto instructions.
Here are the instructions to use Auto Tune Basic with Dynojet PV3:
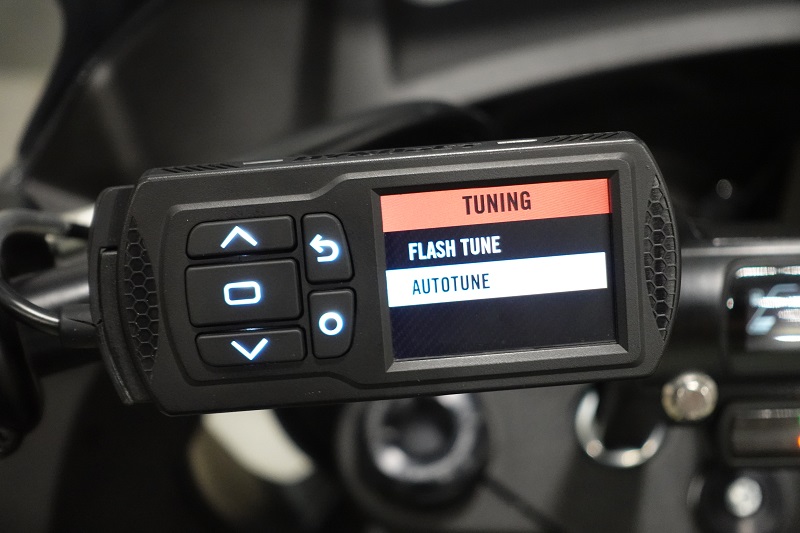
From the main menu, navigate to the Tuning screen.

Select Auto Tune.
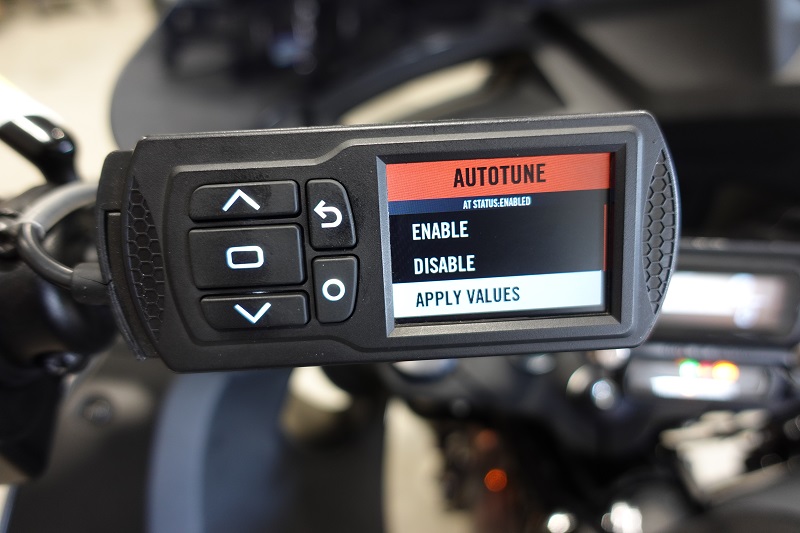
Enable Auto Tune.
Select Auto Tune Basic.

Press Select to choose the current tune that is in your bike, or you can use the back button to select a different tune from the tune manager.

You can now start your bike and ride it. Note the AT indicator in the upper left of the screen as well as the smiley face indication that Auto Tune is collecting data and generating corrections. The engine needs to be up to operating temp and other conditions met for AT to generate corrections. You do not need to go to any specific screen or do anything at this time other than ride the bike as normal. Lastly, if you have not configured the gauge screen the channels will be blank. You can configure gauges from the device tools screen if desired.

When you are ready to apply the AT corrections to your tune, go to Auto Tune > Apply Values and this will apply any learned corrections to your base map. It is also helpful between Auto Tune sessions to Apply Values. This will apply the learned corrections, and make your next AT session more accurate, and will speed the tuning process. Note: when you Apply Values the ECM will continue to be in AT Basic mode.
Final Step:
When finished with the Auto Tune process and you want to finalize your tune there are two steps.
- Apply Values as shown above
- Disable Auto Tune
This will return the ECM to normal running state and update it with the new corrected tune. IMPORTANT NOTE: Be sure to Apply Values first before disabling Auto Tune, if you disable Auto Tune without applying values it will not apply any learned corrections.
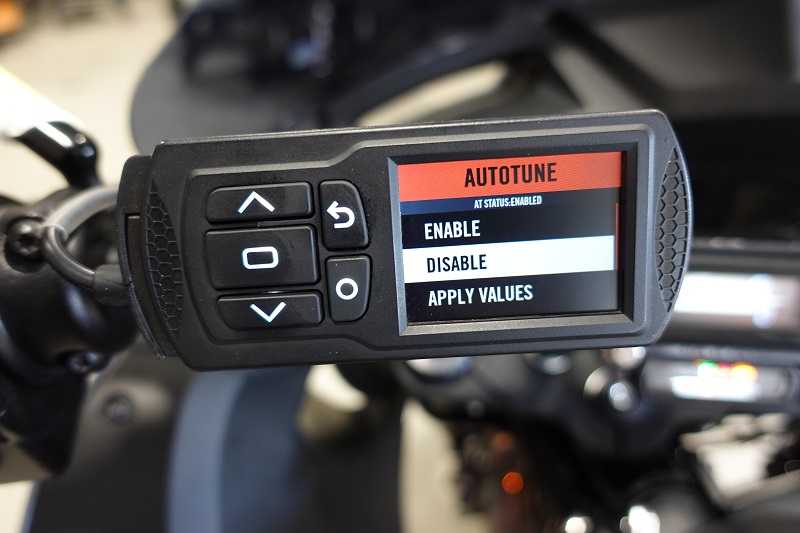
After you select Disable Auto Tune. It will reflash your ECM with the update tune, and you will turn the ignition off for 10 seconds.

The new tune you created with Auto Tune will be stored in the tune manager. You can also verify which tune is in the ECM by the * next to the title.

Additional Notes for Use Auto Tune Basic with Dynojet PV3
Viewing Learned Corrections & Making Adjustments
If you want to view the learned corrections generated by Auto Tune Basic, open the base map and the Auto Tune-generated map in Dynojet Power Core software. Then, right-click and select “Compare Tunes”—this will allow you to see the specific differences between the maps. At this stage, you can make any additional desired tune changes and easily revert Auto Tune edits if needed.
Auto Tune Basic is designed to populate maximum data for tune correction, but it is not recommended for full-time use. Since Auto Tune Basic adjusts various tables and features to optimize data collection, you should only use it during an Auto Tune session. Once you have finished tuning, flash the final map to your ECM so the engine can operate normally.
Important Considerations for Auto Tune Basic Users
- Use Caution at High RPM & Load: When collecting data at high RPMs and under heavy load, always use caution to ensure safe and effective tuning.
- Start with the Right Base Map: Auto Tune Basic only makes corrections on the fuel side and does not adjust ignition timing. A proper base map is essential for accuracy, especially for highly modified engines.
- Not Designed for Full Tune Builds: Due to its limitations, Auto Tune Basic is not intended to create full custom tunes for heavily modified engines. If you are working with a high-performance build, having an accurate base map will significantly speed up the tuning process.
- Consider Professional Tuning: Tuning requires some knowledge of basic engine principles. If you are unfamiliar with tuning or prefer expert assistance, we recommend working with a qualified dyno tuner experienced with Dynojet products.
Firmware Requirements:
Auto Tune Basic requires PV3 firmware version 3.7.8263.23514 or later. Ensure your PV3 is up to date by using Dynojet Power Core software. Simply go to the splash screen, select Tools > Manage Hardware, or follow Fuel Moto’s update instructions.
You can effectively use Auto Tune Basic with Dynojet PV3 to optimize your bike’s fuel mapping and overall performance. Fuel Moto offers unlimited technical & tuning support, please reach out if you have any more questions.