Inner Cam Bearing Removal & Installation – Step-by-Step Guide
Proper inner cam bearing removal and installation is essential when upgrading or maintaining your Harley-Davidson engine. This guide, along with the video below, demonstrates how to safely and effectively remove and install inner cam bearings using the Fuel Moto-supplied tool.
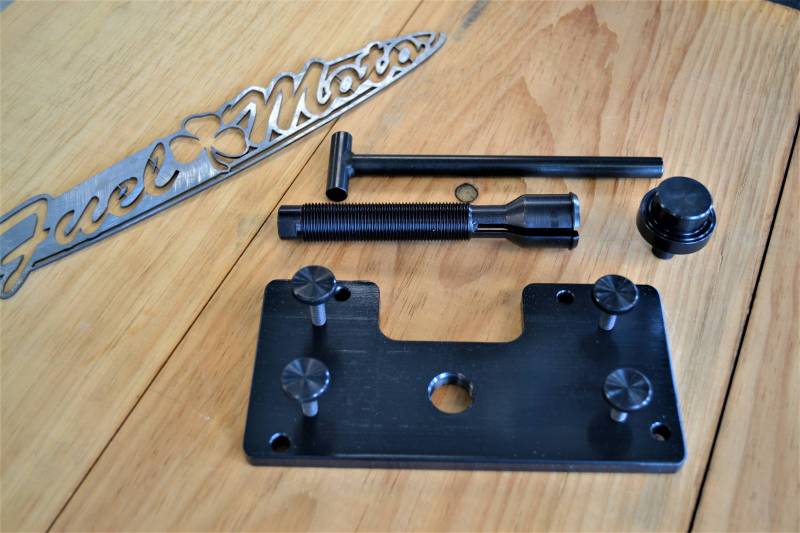
Milwaukee-8 Inner Cam Bearing Puller – Install Tool Set
Twin Cam Inner Cam Bearing Puller – Install Tool Set
Inner Cam Bearing Removal
Removing your inner cam bearing correctly prevents engine damage and ensures a smooth installation process. Follow these steps carefully:
- Lubricate the threads with assembly lube and thread the collet into the base plate, leaving approximately 1.25″ of threads visible through the outlet side.
- Hold the base plate window side up and position the collet on the inner cam bearing. Gently tap the collet through the bearing with a rubber mallet. You’ll hear a click when the collet locks in place.
- Tighten the collet by hand and align the base plate with the engine case, securing it by installing and tightening the four thumb screws.
- Insert the T-pin through the collet to lock it in place with the bearing.
- Extract the bearing by gently turning the collet counter-clockwise. (For Twin Cam engines, repeat for the second bearing.)
Inner Cam Bearing Installation
Once the old bearing is removed, installing the new bearing correctly is crucial for proper engine function.
- Remove the T-pin from the collet and unthread the collet from the base plate.
- IMPORTANT: Install the old cam bearing on the outside of the collet before proceeding. This step prevents the collet from spreading during the pressing process. Failure to do so may damage the collet.
- Apply a small amount of assembly lube and install the bearing driver into the collet. You may need to tap it in using a rubber mallet. *NOTE* Don’t forget step 2 above!
- Thread the collet into the base plate until approximately 2.750″ of threads are visible through the outlet side.
- Install the new cam bearing on the bearing driver, ensuring the rounded side faces away from the tool toward the engine case. Apply lubricant to the bearing’s exterior.
- Align the base plate, collet, and bearing driver with the engine case, then secure it using the four thumb screws.
- Turn the collet clockwise carefully until the bearing driver contacts the engine case, ensuring the bearing is set to the correct depth below the case surface. (For Twin Cam engines, repeat for the second bearing.)
Important Notes
Step 2 of installation is critical – Always install the old cam bearing on the collet before pressing in the new bearing.
Do not use an impact gun or power tools when using this tool.
Use assembly lube on threads and thrust surfaces to prevent damage.
By following these steps, you’ll ensure a smooth and damage-free inner cam bearing removal and installation process. Watch the full instructional video below for additional guidance.
Need high-performance cam upgrades? Check out Fuel Moto’s selection of cams and tuning solutions for Harley-Davidson motorcycles!